Parts Avatar is here to tell you tips to survive simple emergencies on road
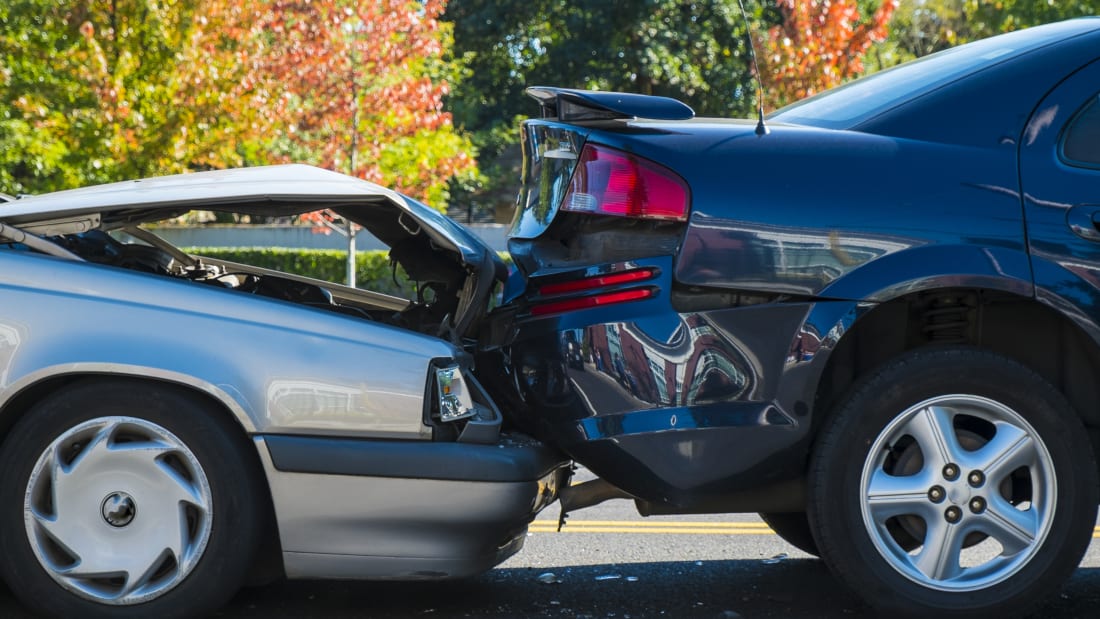
Crisis 1: The Accident you don’t see coming
The most ideal approach to survive a mischance isn’t to get into one. Begin by tolerating obligation regarding everything that happens when you’re in the driver situated. In the event that there’s a disaster area, you are not a mishap casualty, but rather a mischance member. It is your activity, along these lines, to maintain a strategic distance from red-light sprinters, an approaching driver making a left hand over front of you, sudden road stick ups and those drivers who are forming instant messages as they venture to every part of the interstate.
See issues before they move toward becoming crises by looking a long ways ahead, while utilizing your fringe vision to keep position in your path. Here’s the manner by which to guarantee that you’re looking sufficiently far ahead: Use a dry-delete marker to draw an even line on your windshield that crosses simply under your students. On level ground, you ought to once in a while look underneath that line. In tight movement, look through the windshield of the vehicle ahead, or position your auto a couple of creeps to that driver’s left to see brake lights in front of him.
Process what you see. At the point when the brake lights of the considerable number of autos in front of you streak, something is going on ahead. Back off.
Crisis 2: “Imperceptible” Pedestrians, Motorcycles and Small Vehicles
Roughly 36 percent of accidents included a vehicle that was turning or intersection a crossing point, as per insights from the National Highway Traffic Safety Administration (NHTSA). Since the present autos regularly have thick rooftop columns to hold side window ornament airbags, it’s a great deal harder to spot little autos, bikes and walkers that are going to cross your way than it used to be. So before you turn the directing wheel, look where you need to go. Keep in mind this mental aide: BLT, which for this situation remains for brake, look and turn. This frequently implies looking through the side windows. For U-turns, it requires looking through the back traveler window. Regardless of whether you’re voyaging straight, a brisk look through the side glass before you cross a convergence will uncover red-light sprinters and stop-sign captains.
Assemble This Emergency Kit
• Your auto’s proprietor’s manual. On the off chance that you don’t have one, get one from your merchant. It’ll demonstrate to you industry standards to change a tire, clarify what all the notice lights mean, list part numbers for lights, and give the liquid sorts and limits so you can refill with the correct stuff.
• This LED Flameless Flare keeps going any longer than a customary blazing street flare. Append the attractive base to your vehicle and set it to glimmering mode to caution different drivers.
• Spiral journal and mechanical pencil (writes in any position or climate and needs no honing). Use to record mischance data; police report numbers, telephone numbers, and so on.
• A shabby prepaid mobile phone and an auto charger. Regardless of whether you officially possess a PDA, motivate one to keep in your glove box. Modest telephones and chargers are accessible at rebate stores or on the web and can be reloaded with minutes from the side of the street.
What Warning Lights Mean
- Oil light on. The motor has low oil weight. Check the oil level and include oil on the off chance that you have some with you. Something else, have the vehicle towed to a repair shop. Driving a vehicle with low oil weight can cause disastrous motor harm.
- Brake light on. Check the operation of the brake pedal. In the event that it feels springy or goes to the floor, quit driving and have the vehicle towed to an administration office. On the off chance that the pedal feels firm and the brakes stop the vehicle, check the brake liquid level in the store. On the off chance that it’s low, include more brake liquid. In the event that the light remains on after you’ve included liquid however the pedal is still firm, have the vehicle overhauled as quickly as time permits.
- Airbag/SRS light on. The airbags have closed down and won’t work in the event that you get into a mishap. Get the vehicle adjusted soon.
- Footing control/solidness control light on. There’s an issue with the framework. You can even now drive the vehicle, yet practice additional alert on dangerous streets and in turns. Have the framework adjusted soon.
- “Check motor” light on. On the off chance that the motor’s running easily and the transmission is moving appropriately, you can keep on driving the vehicle until the point when you can get it checked by a technician. On the off chance that it’s glimmering, pull over at the closest safe spot. Have the vehicle towed to a repair shop promptly. Driving with a glimmering “check motor” light can wreck costly ($1,200 and up) discharges segments.
- Charging framework light on. There’s a noteworthy disappointment with the charging framework. Drive quickly to the closest repair shop.
- ABS light on. There’s blame in the automated stopping device framework. You can drive the vehicle and work the brakes. Be that as it may, practice more alert on elusive streets. Get the issue looked at soon.
Instructions to Jump-Start a Dead Battery
- Turn off the start and every single electrical frill in the two vehicles.
- Connect the positive jumper cinch (checked “+” or shaded red) to the remote terminals on the great vehicle. They’re found far from the battery. On the off chance that you can’t locate the remote terminals, associate the positive (“+”) jumper cinch to the positive (“+”) battery terminals. At that point do likewise on the dead vehicle.
- Connect the negative jumper clip (checked “– ” or shaded dark) to the remote negative terminal on the dead vehicle. At that point interface the clip to the great vehicle. On the off chance that the vehicles don’t have remote terminals, associate the negative jumper brace to an unpainted metal surface no less than 18 in. far from the battery.

- Start the great vehicle and let it energize the dead battery for no less than five minutes. At that point endeavor to begin the dead vehicle with the links still set up. In the event that it doesn’t begin, call for benefit.
Caution! Associating the jumper links in the wrong request or connecting the spring clasps in the wrong area can harm costly electrical segments and even reason a blast. Your proprietor’s manual leads you through the method well ordered. Tail it to the letter! In the event that you don’t comprehend the methodology, call a tow truck. Car batteries can vent unstable hydrogen gas when they are released. Try not to smoke when kicking off, and don’t utilize jumper links with broke or missing protection.
Instructions to Get Unstuck
Place the gearshift in “1” or “low.” Press the quickening agent and permit the turning wheels to propel the vehicle a bit (don’t surpass 15 mph on the speedometer). At that point discharge the gas and let the vehicle roll in reverse. Instantly apply the gas to move forward once more. Proceed with this technique to fabricate enough force to shake your vehicle out of the groove.
Try not to move the transmission forward and backward amongst “D” and “R.” That can decimate your transmission and result in a repair charge. On the off chance that you can’t shake the vehicle out utilizing the system above, call a towing administration—it’s less expensive than another transmission.
If you are willing to change your car parts all by yourself and want to buy new ones, then all you have to do is to visit our online auto parts store – https://partsavatar.ca/. We care for our customers and that’s why we offer the best quality of products at affordable prices.